Showing posts with label recipes. Show all posts

Tuesday, June 21, 2011

Girls' Day In . . . What Fun!

Today was spent with my dear friend Patty and what a good time we had . . . relaxing and catching up!  Actually we had a celebration!  We finally got to celebrate our birthdays....mine having been in February and Patty's was in May!  Time just gets away from us during the year.  Everything is so hectic, our schedules never seemed to mesh, something just always seemed to get in the way . . . so we decided to wait until school was out to have our celebration and today was the perfect day!

Patty wanted me to come to her house for lunch and upon arriving our first order of business was a nice cool glass of Chardonnay....first order of relaxing that is!  Oh, did I mention Patty has a beautiful house on the lake with gorgeous view?  You'll see that in a minute...right now let me tell you about the delicious lunch she had prepared...Chilled Blueberry Soup that could have been a dessert...so cool and refreshing...and my favorite, Curried Chicken Salad and croissants!  It was all so delicious!! After the Chardonnay and that delicious lunch I was prepared for a nap, but no....Patty said, "Let do a peppermint foot soak!!"  Sounds good to me...first I'm relaxed with the wine...got a full tummy from lunch... and now we're going to soak our feet in a something that smelled so good I wanted to drink it!!!  I will definitely be purchasing some of Dr. Teal's Peppermint Foot Soak tomorrow!  This stuff smells sooo good and makes your feet feel wonderful!  So, here we were, sitting on her screened porch, soaking our feet, overlooking her gorgeous pool and lake view and then...here she comes with one more thing for relaxing...like I'm not already on the verge of snoring....an Apricot Brandy Slush....sssslllllluuurrrrppp!  So delish, I wanted to just gulp that thing down but knew better!  You have got to make up a batch of these to keep in your freezer.  The perfect frozen drink for a hot summer day, especially here in South Carolina where it topped 100 today!  I'll share the recipe at the end of this post, but I just have to say my day was perfect.  Just what the doctor ordered...I was totally relaxed enjoying the time I got to spend with my special friend, catching up on our families, our lives, and just girl talk!  You know Patty and I can go for months without seeing one another and we live really close.  We'll shoot each other an  email here and there...maybe a quick phone call...but we are always connected in our hearts.  We were trying to figure out when we saw each other last and figured out .it was when we exchanged our Christmas presents sometime in January!  We had sooo much to catch up on, it was nice relaxing on her porch, soaking my feet, sipping an Apricot Brandy Slushy, chatting with my dear, dear friend.....thank you Patty, it was a perfect day!  xxoo
                                                                                      ~Becky
These Apricot Brandy Slushes are so good and refreshing!
A little southern watermelon to munch on!  Perfect for a hot summer day!
Aaaahhhhhh...not only does it feel good...it smells heavenly too!

What a gorgeous view!
Will definitely be purchasing this tomorrow...Patty said they have it at Walmart....of course Walmart has everything!

Here is the recipe for the Apricot Brandy Slush, and a note about preparing . . . it may take several days for it to freeze so plan ahead and make sure you've got it mixed up and in the freezer well in advance of consumption!

Apricot Brandy Slush

Stir until dissolved:
1 cup sugar
9 cups water

Add
1 - 12 oz. can orange juice concentrate
1 - 12 oz. can lemonade concentrate
2 cups Apricot Brandy

Mix and freeze.  Stir a few times during the freezing process.  Stir first time after the mixture has been in the freezer for 6 hours.  This may take several days to freeze.

To prepare drinks
Scoop slush into glass (you may need to scrape your spoon over the top to get mixture broken up).  Next, add enough seltzer to liquify while keeping the "slushy" consistency.  If you like your drink a little sweeter use Sprite instead of the seltzer.  This makes 4 quarts of the slush mix.  You can easily half the recipe and freeze in a 2 quart pitcher to keep in the freezer

ENJOY!!


Saturday, June 11, 2011

Today was a good day!

Today was a good day!  Not because anything special happened, but because I got to do things that I love and I wasn't worried about the time.  My life seems to revolve around a calender and a clock.  There's always a deadline for something I'm working on, whether it's something for me or someone else, and the clock just seems to tick way too fast! Before you know it, my day has ended and I still have more to do.  Today was one of those days that I didn't have a deadline on anything!  Yay for me!  I got up early and enjoyed coffee on my  porch and believe it or not, I was cutting grass by 9:00!  You have to get an early start in South Carolina because summer days get hot really quick.  I love to cut grass so it wasn't a chore for me. My husband wanted to do it but I said no, I need the exercise!  I worked in my yard, weeding, trimming, planting more flowers and suddenly I realized I was about to die from a heat stroke.  No problem...I went straight to the pool with all my clothes on and just jumped in!  I'm sure my neighbors thought I was crazy but it cooled me off pretty quick...although I did check the water temperature while I was paddling around and it was 90 degrees!!!  Can you believe that?!  After I finished my yard work I decided a proper dip in the pool with a bathing suit was in order so with sweet tea in hand I floated and relaxed for a couple hours.  It was so nice knowing I could stay in there as long as I wanted to...no deadlines remember?  I finished off the afternoon reading and taking a quick nap....aaahhh...that was so nice!   Tonight my Gamecocks were playing the first game of the Super Regionals and as tradition has it...my dear husband made his famous smoked chicken wings.  He makes the best chicken wings in the world and of course...we had homemade blue cheese dressing to top it off.  I just have to share this recipe with ya'll!  Most people eat celery with their wings and dip the celery in the blue cheese...not us...we dip the wings in the blue cheese!

Homemade Blue Cheese Dressing

1 cup sour cream
1/2 cup Duke's mayonnaise (or Hellman's if you live up north, bless your heart!)
1/2 tsp. apple cider vinegar
1 T. sugar
1/2 tsp. salt
1/2 tsp. black pepper
garlic powder to taste
1 - 4 oz. pkg. crumbled blue cheese

Mix all ingredients together and refrigerate for a couple hours before eating.  This is my favorite salad dressing too!

After munching on wings and cheering my Gamecocks to victory I decided to make up a batch of pesto.  Tomorrow I am going to Charleston to visit my daughter, Brooke, and she LOVES pesto!  Mama had given me a ton of her basil and I harvested my first crop today as well.  I made Brooke's batch tonight and will make mine tomorrow.  I love basil!  Of course my favorite way to eat it is on pasta but since I'm trying to be a little more health conscience it's delicious to mix a little with halved cherry tomatoes and cubed fresh mozzarella!  Light and refreshing!

Pesto

1/4 cup walnuts
1/4 cup pignolis (pine nuts)
6 cloves of garlic
5 cups fresh basil leaves, packed
1 tsp. kosher salt
1 cup good olive oil
3/4 cup freshly grated Parmesan cheese

Note:  If you don't have walnuts you can just use pignolis.  Most pesto recipes only call for pignolis anyway.

Place nuts and garlic in a food processor fitted with a steel blade and process for 30 seconds.  Add the basil and salt.  With the processor running, slowly pour the olive oil into the bowl through the feed tube and process until the pesto is finely pureed.  Add the Parmesan and puree for a minute.  Serve, or store the pesto in the refrigerator with a thin film of olive oil on top.  This will keep the pesto from turning dark.  This freezes well too.  

I grow several pots of basil during the summer and freeze small cartons of pesto to have during the winter!  It's great on pasta, mixed with mayonnaise for a nice sandwich spread, or thin with a little more olive oil and use as a salad dressing!

Hope you enjoy these recipes as much as I have enjoyed my day....getting to do just what I wanted to do...and not watching the clock!  Happy weekend!
                                                                                         ~Becky

Monday, March 14, 2011

Red Velvet Heaven and Other Weekend Recipes

I love Red Velvet anything!  Red Velvet cake, cupcakes, cookies, woopi pies, ice cream, yogurt and NOW...Red Velvet Brownies! Yes, you heard it right...red velvet brownies.  My dear friend Sara loves to try new recipes and knowing how much I love anything Red Velvet, called me last Thursday night to tell me to eat a light breakfast the next morning because she was bringing me a treat.  She was busy baking some brownies as a thank you for another friend but knowing how I love Red Velvet, she shared with me.....which is exactly why my "thanks for the brownie" email back to her had "Shame on you!" as the subject line!  It was to die for.  It can only be described as Red Velvet Heaven!  Of course I had to have the recipe and I couldn't wait to bake a batch first thing Saturday morning.  These brownies are to die for, honestly.  I love Red Velvet cake but I'm thinking this is even better!  I love the consistency of a dense chewy brownie and when it tastes like Red Velvet...it's pure heaven!  I think she got this recipe from another blog, but who cares...it's in my recipe book now!  Oh, and did I mention the icing is white chocolate buttercream...your mouth is watering, isn't it?  I do have a small confession to make...I ate 3 brownies in one day!  I couldn't help myself...but, my justification is 1) I only ate 1/2 brownie at a time (that means 6 trips to the kitchen...not good) and....2) I cut them all from the skinny row!  You know what happens when you cut the brownies in the pan and your last row ends up either fatter or skinnier than the rest...well, I ate the skinny row!  This morning I packed up all that was left so the Lunch Bunch Girls could have a taste...even though Sara is in the group, I wanted her to compare her version with mine...because you see, I have a pet peeve about Red Velvet.  To be a true southern Red Velvet anything, it has to have cocoa, almond flavoring, and red food coloring in the batter.  Her recipe only had vanilla so I substituted 1 tsp of the vanilla with 1 tsp. of almond extract.  The next thing is this...a true southern Red Velevet Cake does not have cream cheese icing.  It has a whipped vanilla butter cream icing.  This recipe was perfect because the icing is a white chocolate buttercream...I know...your mouth is watering again, isn't it?  Well, I just can't finish this post without sharing the recipe so here it is, in all it's glory.  I hope you enjoy it as much as I do...then you'll know why I told Sara...."Shame on you!"  Now, my goal this week...get out the old running shoes and get back on track of my daily 2.5 mile run...I'm gonna need it!

Red Velvet Brownies

1/2 cup butter, at room termperature
1 1/2 cups sugar
2 eggs
2 tsp. vanilla extract - I used 1 tsp. vanilla and 1 tsp. almond
1 1/4 cups all purpose flour
1/4 tsp. salt
3 tablespoons cocoa powder
2 tablespoons red food coloring
2/3 cups chocolate chips (optional) - I left these out

Preheat oven to 350 degrees

Butter and flour an 8 x 8 cake pan

In a small bowl, combine cocoa powder, red food coloring, and 1 tsp. vanilla to create a paste.
In the bowl of an electric mixer, cream butter and sugar until fluffy.  Add eggs one at a time, then add remaining teaspoon of flavoring (either vanilla or almond).  With the mixer on medium speed, add in the cocoa powder mixture.  Beat until batter is completely red. (If at this time your batter is NOT red, you can add a little more food coloring if desired.  color will depend on brand)
Add flour and salt, mixing until just combined.  Fold in chocolate chips if you are using them.
Spread in the 8 x 8 pan.  Bake for 25-30 minutes, or until toothpick inserted in center comes out clean.  Let cool completely before frosting.

White Chocolate Frosting

1 stick of butter, at room temperature
2 1/2 cups powdered sugar
1 tsp. vanilla extract
4 ounces white chocolate, melted
1/2 tablespoons milk (or more if needed)

Cream butter in an electric mixer until fluffy, then add vanilla.  Slowly add in powdered sugar 1/2 cup at a time with the mixer on low speed.  Add in melted white chocolate and beat until incorporated.  To reach desired consistency, add in milk 1 tsp at a time with mixer on low speed.  if frosting becomes too liquidy, simply add additional sugar. 

Now wouldn't these make great little brownie bites in mini muffin cups...and use a big star tip to squirt each one with a dolop of icing!  :)


Last week I decided I wanted to do something special for the girls on my hall.  They are all such wonderful, hard working teachers and needed a little boost.  There are 5 classrooms in all and we barely get a minute to say, "Hi!", muchless carry on a conversation.  So, I invited them all to my room this morning for a little quick breakfast and a time to chat.  Nothing fancy and it was definitely only for a few minutes.  Of course, you might know this was the morning I didn't hear my second alarm so I came flying in trying to get everything set up and the coffee on before they arrived.  I made a really good Grits Casserole that is a favorite at my house.  Come to think of it...anything with grits is a hit at my house!  This is an easy, quick recipe that I have used for Christmas morning breakfast, brunches, week night suppers,  and it makes a great early morning tailgate  dish.  I served this with mini blueberry muffins, mixed fresh fruit and OJ or coffee.  I think we all got a really good start for our 4 day week!!

Grits Casserole

1 cup quick cook grits
4 cups water
1 cup chopped onion
1 cup chopped celery
1/2 cup chopped green pepper
1 lb. Jimmy Dean HOT bulk sausage
1 can cream of chicken soup
2 cups grated cheddar cheese

Preheat oven to 350 degrees

Cook 1 cup quick cook grits in 4 cups water.  Season with salt to taste.

In a large skillet, brown sausage and about half way through the browning process add your chopped veggies.  Cook until veggies are tender (you may want to add a lid to help cooking process) and transfer this mixture to a 9 x 13 baking dish.  Spread evenly over the bottom.  Next, poor grits over the sausage mixture...top with evenly spread chicken soup and finally top with grated cheddar cheese.  Bake for 30 minutes at 350 degrees.

If you like Shrimp and Grits try this!!
My favorite option on this recipe is to add shrimp to the sausage mixture.  While the sausage is browning add 3/4 lb. peeled and deveined medium shrimp.  Shrimp will turn pink and gently curl when they are done...don't over cook though...there's nothin' worse that and over cooked shrimp!  Continue with the rest of the recipe directions.

I'm sorry I didn't get a picture of this dish...I was just in such a hurry to get everything set up and then we had to eat before the chillin' got here, but I'll take one next time I serve up this dish!  Hope ya'll enjoy and have a wonderful week!

                                                                                 ~Becky

Monday, February 28, 2011

Spring-like Weekend With Family and Food....What Could Be Better?

This was a wonderful weekend and I just don't know what could have made it any better!  The weather was in the 80's and the daffodils are in full bloom.  I just had to bring a little bit of that heaven into my classroom today!  Brooke and Brice came in from Charleston and mama was in the kitchen cooking up lots of meals!  I don't know why I feel like I've got to feed my family the whole time they are home....I guess it's just a mother thing...plus the fact that I have no one to cook for during the week with hubby traveling, so when they are all home, I'm in the kitchen.  Friday night we had a favorite family recipe.  It's actually a recipe from The Wreck of the Salty Dog Cafe in Hilton Head Island, SC.  It's one of those one pot meals that goes a long way and is delicious with every mouthful...and if you love shrimp and sausage...you're gonna love this recipe.  My advice on this recipe is this . . . chop everything first and then start cookin'!


Salty Dog's Shrimp Purloo

8 slices bacon, diced  (now any recipe that starts off with 8 slices of bacon has got to be good!)
1 lb. med to large shrimp
1 1/2 cups long grain rice
1/2 cup wild rice
1 cup onion diced
1 tablespoon garlic, minced
2 cups diced fresh tomatoes with juice
2 tablespoons tomato paste
1 lb. smoked beef sausage or kielbasa - sliced in about 1/2" - 1" rounds
1 tablespoon Worchestershire sauce
1/4 tsp. cayenne pepper
1 tablespoon sugar
Salt and pepper to taste and a few dashes of hot sauce if you like (I usually let everyone just add their own hot sauce to their plate because I don't like hot stuff!!  The cayenne pepper adds enough kick for me!)

Before you begin your sauce go ahead and cook your 2 cups combined white and wild rice as you normally would.  I use a rice steamer which makes it perfect everytime!!  Now for the sauce....

First, cook bacon in pot until crisp.  Remove bacon but leave drippings.  Add onion and cook 1 minute.  Then add garlic and cook another minute.  Add tomatoes and tomato paste and stir to combine.  Next add tomato paste, worchestershire sauce, and sugar and simmer on low heat (covered).  You may want to adjust your flavors to your liking.  This is the sauce.  Now that you've made the sauce, it's time to make the purloo.  (I don't spell purloo like they do in this recipe...I don't know which is correct but I spell it perlo!)

In a large pan saute 1 lb shrimp in 2 tablespoons butter until they are all pink.  Remove from pan and add sausage.  Saute sausage until it is a little brown (it's already done you just want to heat and brown it a little).  Add the shrimp back into the large pan, add cooked rice, sauce and fried bacon.  Stir well and season with salt/pepper and cayenne pepper.  (I usually don't use quite a 1/4 tsp cayenne because I'm not one for hot food so season as you like)

I served oven roasted asparagus and garlic toast with the perlo and it was delicious.


Sunday's dinner was another favorite and again, there is a lot of chopping and prep but once that's done, the rest is easy as pie.  For some reason Boeuf Bourguignon has always sounded like the hardest thing in the world to make but actually it's not!  I think because it's French and has that long name it sounds daunting.  There are lots of ingredients in this recipe but like I said earlier, if you prep everything ahead of time, cooking it up is not difficult at all.  This is Ina Garten's recipe out of her Barefoot in Paris cookbook.  She is my all time favorite cook/personality on the FoodTV network.  She makes cooking seem so effortless and really it is.  I'll have to do a whole post on Ina because she is wonderful!

Boeuf Bourguignon

1 tablespoon good olive oil
8 oz. bacon, diced
2 1/2 pounds beef chuck cut into 1 inch cubes
kosher salt
freshly ground pepper
1 pound carrots, sliced diagonally into 1-inch chunks
2 yellow onions, sliced
2 teaspoons chopped garlic (2 cloves)
1/2 cup cognac or good brandy (I do leave this out because I never buy brandy or cognac)
1 bottle dry red wine (I use Pinot Noir)
2 - 2 1/2 cups beef broth
1 tablespoon tomato paste
1 teaspoon fresh thyme leaves
4 tablespoons unsalted butter at room temperature, divided
3 tablespoons all-purpose flour
1 pound frozen small pearl onions (1 use about 1/2 lb)
1 pound mushrooms - sliced thickly

Preheat oven to 250 degrees.

Heat olive oil in a large Dutch oven.  Add the bacon and cook over medium heat until crisp.  Remove bacon with a slotted spoon when browned.  Dry beef cubes and salt and pepper well.  In batches in a single layer sear the beef in the hot bacon drippings 3-5 minutes, turning to brown on all sides.  Remove seared meat to the plate with the cooked bacon.  Set aside.

Toss the carrots, onions, 1 tablespoon of salt and 2 teaspoons of pepper into the fat in the pan and cook over medium heat for 10-12 minutes stiring occasionally, until the onions are lightly browned.  Add the garlic and cook for 1 more minute.  Add the cognac (if you are using it) and ignite with a match to burn of fthe alcohol.  Put the meat and bacon back into the pot with any juices.  Add the wine plus enough beef broth to almost cover the meat.  Add the tomato paste and thyme.  Bring to a boil, cover the pot with a tight fitting lid, and place in the oven for about 1/1/4 hours or until the meat and vegetables are tender when pierced with a fork.  Remove from oven and place on top of the stove.

Combine 2 tablespoons of the butter and the flour with a fork and stir into the stew.  Add the frozen onions.  In a medium pan, saute the mushrooms in the remaining 2 tablespoons of butter over medium heat for about 10 minutes, or until lightly browned, and then add to the stew.  Bring the stew to a boil, then lower the heat and simmer uncovered for 15 minutes.  Season to taste.

Take a large loaf of country bread or bagget and cut on the diagonal.  Toast in the oven.  Once you remove it from the oven rub each slice of bread on one side with a raw garlic clove.  For each serving spoon the stew over a slice of bread.


Now you have two new recipes to try on your family this week!  I bet you will find they are so easy to prepare and your family will love you for it!   Bon appetit!

                                                                                                  ~Becky

Sunday, February 20, 2011

A Full Weekend and Spring Is In The Air!

This has been a pretty full weekend and I've enjoyed every minute of it!  Spring is in the air in Columbia, SC and I was drawn to work in the yard....but not before I fretted for two days over deleting my blog background!  Yes...what a dumb thing I did, of course by accident, and I'm mad at myself for one slight click of the mouse!  I was trying to be cordial and add someones button to my sidebar and when it didn't work, I deleted the wrong thing.  Problem is, I didn't have the code backed up anywhere and when I went to the website where I got it, it was no longer available.  Pooh!  So, I started the search for a new one but nothing, I mean nothing, struck my fancy.  I finally decided on the one you see here and I guess it will do for now.  Hopefully I will locate my old one and I will feel like I'm at home again...right now I'm trying to get use to the new look!  I am so ready for spring!  It is so comforting knowing it's in front of me instead of behind me!  I've even made the switch with my nail polish from my winter OPI Big Apple Red to my summer OPI Cajun Shrimp!  My only dread is the pollen that I know will be here in about 2-3 weeks!  The weather here has been wonderful so, Saturday morning I was out bright and early in my back yard cleaning out flower beds, trimming hedges, and raking leaves while my hubby cleaned out the pool.  My first daffodil of the season has bloomed and by next weekend they will all be in bloom!  I can't wait!  My peonies have just broken ground and tiny little red leaves are popping out in the trees!  The dreaded chore of cutting back all my crepe myrtles is something I put off until it just has to be done, but this year I am determined to have everything pruned by the end of February.  I have one week to finish this task, but if the weather holds out, I think I'll get it done.  I did finish my myrtles and they look bald.  Here is a picture of how they looked in the fall and how they look now. 


Pretty pitiful, huh?   This weekend's weather is just a tease I know, but it did inspire me to get busy with everything that has to be done.  My plans for Saturday night supper went by the wayside when hubby and I decided to take a break for a late lunch causing neither one of us to be hungry at suppertime, so guess what I ended up snacking on instead?  You got it, ice cream....but not any ordinary ice cream!  This was gelato and I found it at Publix.  Actually I saw it a couple weeks ago and recommended it to my daughter and she loves it.  I decided to try some myself and I am hooked.  It is absolutely delicious...ya'll it is so good it will make your tongue slap your brains out. 
It's called Talenti Gelato.  You've got try it, but beware, it's additive!  I tried Sea Salt Caramel which has chucks of chocolate coated caramels in it.  Smooth as silk.  I think it's taken the place of Ben and Jerry's Chunky Monkey which has been my all time favorite!  Try it, but beware...you will be hooked!

Sunday's lunch ended up being what was suppose to be Saturday night's supper which was a London Broil I had been marinating.  My husband grilled it and it was so good...I though you might like the marinade I use.  It's a family favorite and the longer it marinates the better.  I usually try to let it marinate 24 hours but at least 8 hours is enough.

London Broil Marinate

4 tsp. Adolph's Meat Tenderizer
2 T. table sugar
4 T. cooking sherry
4 T. soy sauce
2 T. honey
2 tsp. salt
2 tsp. Accent

Mix all ingredients together and microwave about 30 seconds to melt the honey.  Pour over London Broil and marinate for 8 - 24 hours. 

Here are two more recipes I will share. The Lunch Bunch girls are tired of fixing lunch and....we're tired of trying to think of something good to fix for lunch, so, we are each bringing a salad to share tomorrow and for the rest of the week, or however long it lasts.  I am taking a marinated vegetable salad which is good because the longer it marinates, the better it gets.  This will last about a week in the fridge.  It makes a lot so it's a good dish for a large crowd and especially good for tailgating.


Marinated Vegetable Salad

1 can French Style Green Beans
1 can sliced carrots
1 can bean sprouts
1 can sliced water chestnuts
1 can green peas
1 can whole kernel corn
1 2-oz jar chopped pimento
1 2-oz jar green olives
3 stalks celery chopped
1 green pepper chopped
1 small purple onion, chopped (I don't use the whole onion because I'm not real big on raw onions)
Dressing

Drain all canned veggies and dump in bowl.  Add the remaining ingredients and add dressing.  Cover and marinate overnight.

Dressing

1 1/2 cups vinegar (I use apple cider vinegar)
1 1/2 cups water
2 tablespoons oil
1/2 cup sugar
2 tablespoons (or less) salt
1/2 tablespoon pepper

Combine all ingredients and whisk togeter.
I enjoy this recipe because the whole bowl only has 2 T. oil and all those veggies...it's got to be healthy!  Great thing to have for a snack too.

While I was in the kitchen I decided I couldn't send hubby on the road this week without something homemade so I made him a bowl of one of my own concoctions.  I made this up a couple years ago and it's been a family favorite ever since.  It's a really good pasta salad that he loves and will keep about a week in the fridge.  It has a Greek flair to it and easy to make, just a lot of chopping!  Now keep in mind I made this up so you can adjust the amounts as you like...in fact I just dump the ingredients in a bowl and keep tasting it until I think it's there.


Orzo Pasta Salad

8 oz. cooked Orzo pasta
2-3 tablespoons olive oil
2-3 tablespoons red wine vinegar
4 oz. feta cheese
3 green onions chopped
1/2 bottle drained capers
1 medium chopped red pepper
1 small can sliced black olives
chopped fresh baby spinach (add as much or as little as you like)
salt/pepper to taste
1/2 teaspoon dried basil
1/2 teaspoon dried oregano

Cook pasta and drain.  Add olive oil and toss.  Add remaining ingredients and toss well.  You can adjust the vinegar, olive oil and herbs to your liking.

Hope you enjoy these recipes and don't forget to enter my Pink and Green Giveaway in the post below.  You don't have to do everything that is listed.  Just make sure you tell me in your comment what you did because each thing will count as an entry!   Hope you all have a wonderful week!  Think spring!
                                                                                         ~Becky

Thursday, February 3, 2011

The Lunch Bunch Girls Celebrate Birthdays!

For those of you who did not catch my post awhile back about who the Lunch Bunch Girls are, let me catch you up!  The Lunch Bunch Girls are 6 ladies who have all eaten lunch together for the past 3 or 4 years.  We have a lot in common and one of our favorite things to do is talk about food, cook food, share food, and celebrate with food!  Yes, we celebrate everything with a meal!  Sometimes we just celebrate the fact that we still feel like cooking and bring enough for everyone to share at lunch!  So, it is only befitting that when one of us has a birthday...we've got to have a meal.  Last week we celebrated the birthdays of Donna and Lesli.  Donna's birthday is January 20 and Lesli's birthday is July 29 but since it's so hard for us to get together in the summer (we are all in education and just go wild in the summer when we have a little freedom and you just can't get us all together at the same time!) we celebrate Lesli's half birthday in January.  Everyone met at my house for our birthday dinner and decided our menu would consist of salads!  Now I didn't say salads as in "diet" because our salads were far from calorie free!  We each prepared a different salad (except for the honorees...they just show up and eat and open presents!  What fun!!) and I prepared apps and dessert which was homemade coconut ice cream and birthday cake.  I have been decorating cakes for 27 years and one day I'll have to do a post on my many adventures in cake decorating, but for now I will just share a picture of the cake I made for Donna and Lesli and tell you... it is such a joy to be able to make a special cake for such special friends!  Here are a few pictures of our celebration...we had so much fun and the best food we had all night was of course....laughter!


Happy Birthday!

Happy Birthday Donna!

Happy Birthday Lesli

The Lunch Bunch Girls (minus me!) Sara, Joyce, Donna, Lesli, and Diane

Here is a picture of another cake I baked last week for a dear friend who needed a birthday cake.  I no longer do cakes everytime someone asks for one, but on occasion someone will ask if I still bake cakes and if time and energy permits, I will do it!

Now for the recipes I used for the Coconut ice cream and Curried Rice salad.  Everytime I take the curried rice salad to a function it is always a hit...it is especially good with barbecue and it's the perfect dish for a tailgate!  This recipe was meant to be made in 2 steps but if you are running short of time don't worry about it...I've thrown it all together at once!

Curried Rice Salad

1 cup rice cooked as usual with 3 chicken boullion cubes added to the water
1/4 cup minced onion
1 cup diced celery
1 tsp. curry powder
salt and pepper to taste
1 box green peas (English peas) thawed
1/2 cup Italian dressing plus 2 tablespoons
1/2 cup mayonnaise

Cook rice as usual using 3 boullion cubes in the water.  Pour frozen peas into a collander and rinse with hot water until they are completely thawed and at room temperature.  Add the peas to the rice and add onion, curry, salt, pepper and 2 tablespoons Italian dressing.  Stir and refrigerate this mixture overnight.  (you can skip that part and go right to the next!)  The next day add the celery, 1/2 cup Italian dressing and 1/2 cup mayonnaise and stir well.  This keeps a while in the fridge but it probably won't last too long on your dinner table!

Curried Rice Salad

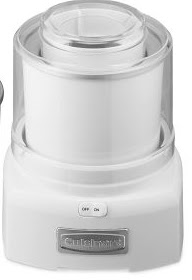
One night I was eating a delicious coconut creamcicle or popcicle, I'm not sure what it was, but there I was in seventh heaven and what did I say....of course...I'm gonna try to make this!  So...this is the recipe I came up with and everyone seems to enjoy it.  I have a Cuisinart Countertop Ice Cream Maker that I LOVE and that is what I used to make this ice cream.  If you don't have a countertop ice cream maker and love ice cream you definitely need to get one of these babies!  It makes just the right amount of ice cream and you can really get creative with the flavors. 


Here is my version of coconut ice cream!

Becky's Coconut Icecream

1 can coconut cream (you can find this where they have drink mixes for pina coladas)
Half and Half
1 tsp. coconut flavoring
3/4 cup angel flake coconut

Using a 4 cup measuring cup pour the can of coconut cream in and then fill to the 4 cup line with half and half.  Add coconut flavoring and stir well.  Start countertop ice cream maker and pour liquid into the frozen bowl.  Let churn for 30-40 minutes and then add the angel flake coconut.  Let ice cream churn for about 2 minutes and spoon into a freezer container and freeze until firm.

That's all there is to it and it is soooo good...it would probably be even better with some chocolate chips mixed in or hot fudge on top....yum...my mouth is watering as I type this!  Well, that's about all for now!

                                                                                              ~Becky

Tuesday, January 25, 2011

B-r-r-r It's Still Cold Outside...Let's Make Soup!

During the cold days of winter I seem to find myself  in the kitchen on Sunday afternoons stirring up a pot of soup for the week.  I LOVE soup in the winter!  It just seems to warm the soul as well as your tummy.  Sometimes the soup goes back to Charleston with my daughter, sometimes it is shared with a neighbor, and sometimes I just cook up a pot to share with my friends at school.  Nevertheless, soup is never wasted in my household and it's something that is easily shared with others .... and what a treat!  I have many treasured recipes. Some I've even made up myself, so I thought I would share 2 of my all time favorites today.  The first soup is one I just made up.  I hope you enjoy it as much as my family does!

Becky's Cheesy Potato Soup

1 medium onion, chopped
4 medium potatoes, diced
16 oz. chicken broth
1 pint heavy cream
8 oz. Velvetta cheese, cubed
1 quart milk (you can add more or less depending on how much broth you like)
Kosher salt and fresh ground pepper to taste
Fried bacon, crumbled

In a large stockpot combine onions, potatoes and chicken broth.  Add salt and pepper.  (Remember, cheese is salty so go easy on the salt)  Simmer until vegetables are tender.  Add heavy cream and milk.  Bring this to a slight simmer and add Velvetta cubes a couple at a time, stirring soup so the cheese doesn't stick to the bottom of the pot.  Once all the cheese has been added and melted you may want to make a roux or thickening for the broth.  To make a roux I melt about 2 tablespoons of melted butter and add to that 2 tablespoons flour.  Mix together well and while the soup is simmering I add a little at a time with a fork, whisking it into the broth.  When the broth is as thick as you like it turn soup down to warm.  This is not a soup that has to cook a long time.  Once your potatoes are tender, everything else is ready!  Now the best part is how to serve it.  Fry several strips of bacon (one of my best friends!  Bacon is to me like butter is to Paula Deen!).  Crumble bacon and sprinkle generously on top of each bowl of soup.  Aaaahhh...it's so good!

The next recipe is one shared by my dear friend Lesli.  She is part of the Lunch Bunch Girls and this has become one of our all time favorites.  It tastes like something from a 5-star restaurant.  This is what I served at my cookie swap this year along with Garlic Cheddar Biscuits and salad! 

Tomato Bisque

2 large onions, chopped
5 large garlic cloves, minced
1/2 stick butter
1- 28 oz. petite diced tomatoes
1 - 46 oz. can tomato juice
3 bay leaves
1 tsp each: basil, dill, thyme, parsley
1 tsp baking soda
8 oz. cream cheese, softened cut into pieces
2 cups light cream
Kosher salt and freshly ground pepper

Melt butter in large dutch oven.  Saute onions until translucent, then add garlic and saute for about 1 minute more.  Add tomatoes, tomato juice and herbs. Bring to a simmer. Simmer for 15 minutes, stirring occasionally. Stir in baking soda. (It will foam up!) Simmer for 10-15 minutes. Add cream cheese and cream. Cook for 15 minutes until cream cheese melts.  This is sooo good with grilled cheese sandwiches!


 Now, get that soup simmerin', grab a good book, and snuggle up on the couch with an afgan for a warm, fuzzy day!
                                                                                       ~Becky


Wednesday, December 1, 2010

Cookie Swap Time Part II

Now that you know how to get things started for your cookie swap I thought I'd share a few things we've done at my cookie swaps in the past!  You know ladies only need 3 things to have a good time; wine, food, and each other!  So with Christmas music in the background and everyone arriving, obviously we start off the evening with wine and a few apps!  I don't like to fix anything too heavy so we will all have room for dinner but we definitely need something on our tummies as we sip our chardonnay!  I usually fix some sort of dip or cheeseball with crackers, some sort of veggie tray and something salty like nuts or chex mix.  One of my favorite dips is a taco dip.  Everyone loves it and it is sooo easy too make.  Here is the recipe:

Taco Dip

1 large container sour cream
1 package Hidden Valley Fiesta Ranch Dip Mix
Small diced tomato (you decide how much...I usually use 2 Roma tomatoes)
Thinly sliced green onions
1-1 1/2 cups grated Jalepeno Monterry Jack cheese

Mix the Fiesta Ranch Dip Mix with the sour cream and spread in the bottom of a shallow dish like a ceramic pie plate or quiche dish.  Top with grated cheese, onion and tomatoes.  Serve with Tostitos!  It's delicious!  If you can't find the Fiesta Ranch Dip Mix you can substitue by using 1/2 package Hidden Valley Ranch Dressing Mix with 3/4 package regular Taco Seasoning Mix.

This year I am going to make a cheese ball that is absolutely delicious.  It's from Tastefully Simple and it's called Creamy Crab Cheesball Mix.  You can order from Tastefully Simple online and they deliver within a few days.  You can order from my daughter Brooke over at Shrimp and Glitz by going to her website at www.tastefullysimple.com/web/bjackson2 Everything by Tastefully Simple is wonderful!  They have lots of good gift ideas too!

After we chat a while, laugh, sip our wine, laugh, nibble on apps, it's about time for dinner.  I don't prepare a big spread of food, I usually do something light and simple.  I don't want to be cooking while everyone is having a good time!  In years past I've prepared things such as a crab bisque with quiche, shrimp perlo and a salad, and last year we had a wonderful shrimp and corn chowder with salad.  This year I'm thinking of having a delicious Tomato Bisque that is sooo easy to make it tastes like you were eating in a 5 Star restaurant, and cheddar and chive muffins with my 7 layer salad.  I'll share those recipes later.  You don't have to prepare a meal.  I've been to cookie swaps before and we just had apps.  I've even been to swaps where everyone brought their favorite app along with their dozens of cookiesI  It's all in what you want to do!

It's so much fun when everyone arrives with their bags of cookies!  It's just as exciting to see how they are packaged as it is to see what kind of cookies everyone baked!  I've already heard some snippits of what kind of cookies my friends are bringing!  I can't wait!  Everyone puts their cookies on the table and it's so tempting to start swapping right then and there so we can sample everyone culinary prizes! 

Once we've all filled our tummies it's time for dessert!  Last year it was 2 hours before everyone was to arrive and I had no idea what to fix...I looked in my pantry and saw a loaf of bread...hhhhmmmm...how about a bread pudding.  I love bread pudding, especially in the winter time.  That's another recipe I will share later...but to give you a hint, it has dried cranberries in it and nutmeg sauce on top...now how bad can that be?  (I love Ina Garten!)

Okay....time to go to the table for the big swap!  Be sure to take a large container to haul the loot home in!  Market baskets are perfect for this, especially if they are monogrammed!  Everyone goes around the table and takes 1 container of each type of cookie.  Husbands are home anxiously awaiting the arrival of the sweets!!  It's about time to leave but before everyone heads out the door I always have a little treat for my guests.  You don't have to do this but I LOVE giving gifts.  I do something every small and inexpensive.  I usually don't spend over $2 each...YES, you can find cute things for very little money.  The dollar store is my best friend!  Here are some of the things I've given in past swaps...it's just a small token of love for my dear friends!


One year I gave each person a little bayberry votive.  I found the votive holders at a local crafts store for $0.50 each...the candle was probably $1.00.  I wrapped it in cellophave and attached a ribbon and a little notecard with the following poem

"This bayberry candle is a gift from a friend
On Christmas Eve burn it down to the end
For a bayberry candle burned down to the socket
Brings luck to the home and wealth to the pocket."


This is a tart burner I found again at a local craft store...ON SALE...for $2.00.  I added a tealight and a tart.
I thought the teapot was perfect for the kitchen...where we spend a lot of our time!


Last year I gave each friend a personalized ribbon notepad that I made.  The size of the notepad is 8.5 x 5.5
I love limegreen and red for Christmas!
Well, after hugs and goodbyes everyone leaves and I take off my shoes, pour me a big glass of wine, throw on my apron and clean up the kitchen.  It's actually one of my favorite household chores!  Oh, and more more thing...dress FESTIVE!  You're there to get in the Christmas spirit!  I'll let you know how this year's cookie swap goes next week!  Until then I've got to decide what kind of cookies I'm going to bake!